October 31, 2010

Smooches!!

Hi everyone! Happy Sunday!!

Here is a card I made for my parents' anniversary which was this past Thursday. This was such fun to make!!

I started by stamping the Elephants In Love A La Carte stamp from Taylored Expressions in Memento Tuxedo Black onto Choice Buttercream and colored them with Copic Markers.

I cut out and embossed the panel using Square Nestabilities and sponged the edges lightly with Memento Cantaloupe to define it a bit. I added Crystal Stickles to all of the hearts and I LOVE how super sparkly they are!

The patterned paper is from Indie Girl from Sassafras Lass and I LOVE the patterns in this pad!! SO fun! I stitched around each layer on my sewing machine, using a different stitch for the focal panel.

The sentiment, "Smooches" is from Animal Love Sentiments, also from Taylored Expressions, and I cut it out using Tags Trio from Spellbinders which I also sponged a bit with Memento Cantaloupe. I created the bow with the Bow Easy using some Blue Bayou Stitched Ribbon from my stash!! I added three green Twinkles, and of course, used the AMAZING Embellie Gellie to stick em' on the glue! LOVE this stuff!

I hope to see you back here tomorrow for day one of peeks for the newest release from Taylored Expressions!! Thanks SO much for stopping by!!

Recipe:
Stamps: Elephants In Love and Animal Love Sentiments from Taylored Expressions
Paper: Blue, Choice Buttercream & Indie Girl from Sassafras Lass
Ink: Memento Tuxedo Black and Memento Cantaloupe
Accessories: Copic Markers, Crystal Stickles, Twinkles, Rectangle Nestabilities, Tags Trio by Spellbinders, Embellie Gellie, Bow Easy, Blue Bayou Stitched Ribbon and Foam Tape

Jodi

October 30, 2010

Happy Thanksgiving!

Hi everyone!! Happy Saturday!

Here is my card for today's Sketch For You To Try! Another awesome sketch from Jen!!

For my card today, I used the GORGEOUS Bountiful Blessings set being released tonight from There She Goes! This set has STUNNING images that are a DREAM to color!!! I chose to work with the wreath as it was perfect for today's sketch.

I stamped the wreath in Memento Tuxedo Black onto X Press It Blending Card and colored it with Copic Markers. I cut it out and embossed it using Circle Nestabilities which I then layered over Lacey Circles Nestabilities.

The patterned paper is all from Restoration by Crate Paper (just one of my many new paper obsessions), and I embossed the background panels with the Polka Dots Embossing Folder.

I added just a touch of paper piercing (I used to pierce every single layer and element on my cards...remember those days?) and added a sentiment panel using the "Happy Thanksgiving" sentiment from Bountiful Blessings. An orange gem in each corner finished things off!!

Make sure you head on over and visit my SFYTT sisters for today's SFYTT!

Amber Hight
Amy Rohl
Amy Sheffer
Carole Burrage
Jen del Muro
Jenn Diercks (sitting out this week)
Kelly Lunceford
Megan Lock
Sony Christoph
Susan Liles
Lesa Smaligo - Our AWESOME October Designer of the Month!

Thanks SO much for stopping by!!! I hope to see you tonight at the There She Goes Release Party!!

Recipe:
Stamps: Bountiful Blessings from There She Goes
Paper: Really Rust, Suede Brown Dark, X Press It Blending Card and Crate Paper Restoration
Ink: Memento Tuxedo Black
Accessories: Copic Markers, Circle and Lacey Circles Nestabilities, Polka Dots Embossing Folder, Paper Piercing Tool and Template, Orange Gems and Foam Tape

Jodi

October 29, 2010

Happy Birthday!

Hi everyone! Happy Friday!!

Here is a card I created just for the pure fun of it!! I recently got some DELISH Paper Girl papers from The Girls Paperie, and I kept envisioning them with the Pure Innocence line from My Favorite Things.

I started by stamping this cutie pie from Pure Innocence - Being Cute Is What I Do from My Favorite Things in Memento Tuxedo Black onto X Press It Blending Card and colored her with Copic Markers.

I cut out and embossed the panel with Oval Nestabilities and sponged the edges with Memento Desert Sand for just a bit of definition.

I paper pieced her top with one of the same Paper Girl patterns that I used on the card. I love how CUTE she is!!! I added TONS of machine sewing on this card...oh, it makes me happy!

I wanted this to be a birthday card, so I stamped the "Happy Birthday" sentiment from A La Modes Time To Celebrate directly onto the patterned paper. I added a border of lace trim and created a rose using My Favorite Felt Necessary Neutrals (the white) and the new Die-Namics Rolled Rose Die. I cut out the felt leaves using My Favorite Felt Outdoor Essentials (the green) and the Die-Namics Flower Trio and Leaf Trio.

Thanks SO much for stopping by!!!

Recipe:
Stamps: Being Cute Is What I Do PI and A La Modes Time To Celebrate from My Favorite Things
Paper: Choice Snow White, X Press It Blending Card, Razzleberry Medium & Paper Girl from The Girls Paperie
Ink: Memento Tuxedo Black and Memento Desert Sand
Accessories: Copic Markers, Oval Nestabilities, Die-Namics Jumbo Scallop Die, Die-Namics Rolled Rose Die, Die-Namics Flower Trio and Leaf Trio Die, My Favorite Felt in Necessary Neutrals and Outdoor Essentials, Pink Brads, Lace Trim from Kaisercraft and Foam Tape.

Jodi

October 28, 2010

There She Goes Preview: Day Three

Hi everyone! Happy Thursday!!

Today is the third day of previews for the newest release from There She Goes!

Did you make your way here from the amazing Jessie's Blog? If so, perfect! If not, please start the hop at the There She Goes Blog so you don't miss a thing!

I am SO excited about the set that the Trendsetters are previewing today...Snowy Days!!!

Just wait until you see the ADORABLE images and sentiments in this set....SO super cute!!

For my card, I started by stamping this darling image in Memento Tuxedo Black onto X Press It Blending Card and colored it with Copic Markers. I added, with a glue pen, some Sugar Sparkly Fluff to his hat and the trim of the rug...SO fun!!

I cut out and embossed the panel using Circle Nestabilities and sponged the edges with Memento Desert Sand. I layered this panel over a panel cut from Square Nestabilities.

The patterned paper is from Everybody Loves Christmas by Echo Park Papers, and I sponged the edges of each panel before adding some machine stitching.

The sentiment, "Happy Holidays" was stamped directly onto the patterned paper and I finished this cutie off with four white brads and a green satin ribbon/bow combo that I created with the Bow Easy. The border was created with the Die-Namics Open Scallop Border.

Would you LOVE to win Snowy Days for your very own? Getting that chance is super easy! Simply hop around and comment on each Trendsetter's Snowy Days posts and when you are done, head back to the There She Goes Blog and leave your information on the Snowy Days post! One lucky winner will win Snowy Days! Good luck!

The next stop on this hop is at the super fabulous Julie Lacey's Blog!

Thanks SO much for stopping by!!

Recipe:
Stamps: Snowy Days from There She Goes
Paper: Choice Snow White, Classic Red, X Press It Blending Card & Everybody Loves Christmas by Echo Park Papers
Ink: Memento Tuxedo Black and Memento Desert Sand
Accessories: Copic Markers, Circle Nestabilities, Square Nestabilities, White Brads, Die-Namics Open Scallop Die, Green Ribbon, Bow Easy, Sponges and Sewing Machine

Jodi

October 27, 2010

There She Goes Previews: Day Two

Hi everyone! Happy Wednesday!!

Today is the second day of previews for the newest release from There She Goes!

Did you make your way here from the amazing Jessie's Blog? If so, perfect! If not, please start the hop at the There She Goes Blog so you don't miss a thing!

The Trendsetters are previewing TWO awesome new sets today...Gobble and In Stitches!! I am SO excited!!

My card today features both of these fun new sets!! I started by stamping the turkey and the sign in Memento Tuxedo Black onto X Press It Blending Card and colored them with Copic Markers.

I cut out and embossed the focal image, cutting around the sign, with Circle Nestabilities which I layered on cardstock cut with Lacey Circles Nestabilities. I sponged the edges for a bit of definition.

I stamped one of the stitched borders from In Stitches in Adirondeck Espresso all around the panels of patterned paper. LOVE this set and I can see that I will be using this ALOT to add that extra touch to my cards!

The patterned paper is Pyrus from Basic Grey and I embossed it with the Polka Dots Embossing Folder a la Kim Teasdale (I LOVE how she does that!). I added some lace trim, which I am addicted to these days, as well as some leaf ribbon from my stash. I finished this one off with two orange brads on the bottom corner!

Would you LOVE to win Gobble AND In Stitches for your very own? Getting that chance is super easy! Simply hop around and comment on each Trendsetter's Gobble/In Stitches posts and when you are done, head back to the There She Goes Blog and leave your information on the Gobble/In Stitches post! One lucky winner will win Gobble and In Stitches! Good luck!

The next stop on this hop is at the super fabulous Julie Lacey's Blog!

Thanks SO much for stopping by! Hope to see you back tomorrow for a peek at another fab new set that will be released on Saturday!!

Thanks SO much for stopping by!!

Recipe:
Stamps: Gobble and In Stitches from There She Goes
Paper: Suede Brown Dark, Papaya Puree Dark, Choice Buttercream, X Press It Blending Card and Pyrus by Basic Grey
Ink: Memento Tuxedo Black, Adirondeck Expresso, Memento Canteloupe & Memento Tangelo
Accessories: Copic Markers, Sponges, Circle Nestabilities, Lacey Circle Nestabilities, Orange Brads, Lace Trim from Kaiser Craft, Leaf Ribbon Trim and Foam Tape

Jodi

October 26, 2010

There She Goes Previews: Day One

Hi everyone! Happy Tuesday!! Today is the first day of previews for the newest release from There She Goes!

Did you make your way here from the amazing Jessie's Blog? If so, perfect! If not, please start the hop at the There She Goes Blog so you don't miss a thing!

Today the Trendsetters are previewing a GORGEOUS new set designed by the ever inspiring Torico, Bountiful Blessings! It's AMAZING!!!


For my card, I knew I wanted to use this BEAUTIFUL cornucopia image from this new set. I stamped it in Memento Tuxedo Black onto X Press It Blending Card and colored it with Copic Markers. The images in this set are a DREAM to color!!!

I cut out and embossed the panel with Oval Nestabilities and sponged the edges with Memento Desert Sand and Memento Potter's Clay. I layered this panel onto a panel of Kraft cut with Scallop Oval Nestabilities.

The patterned paper is Toil and Trouble by The Girl's Paperie and I ran both patterns through the Cuttlebug with the Fleur De Lis Embossing Folder and then sponged the edges.

I added a double scallop border with the Die-Namics Jumbo Scallop Die, some yummy lace and a Jenni Bowlin Vintage Button. A vanilla brad in each corner ties it all together. The sentiment, "Bountiful Blessings" was cut out using the Sentiment Flag Die from Lil' Inker.

Would you LOVE to win Bountiful Blessings for your very own? Getting that chance is super easy! Simply hop around and comment on each Trendsetter's Bountiful Blessings posts and when you are done, head back to the There She Goes Blog and leave your information on the Bountiful Blessings post! One lucky winner will win Bountiful Blessings! Good luck!

The next stop on this hop is at the super fabulous Julie Lacey's Blog!

Thanks SO much for stopping by! Hope to see you back tomorrow for a peek at TWO more new sets that will be released on Saturday!!

Recipe:
Stamps: Bountiful Blessings from There She Goes
Paper: Kraft, Choice Buttercream, X Press It Blending Card and Toil & Trouble from The Girls Paperie
Ink: Memento Tuxedo Black, Memento Desert Sand and Memento Potter's Clay
Accessories: Copic Markers, Oval and Scallop Oval Nestabilities, Sponges, Fleur De Lis Embossing Folder, Die-Namics Jumbo Scallop Die, Sentiment Flag Die from Lil' Inker, Lace from Kaisercraft, Chocolate Twine, Vanilla Brads and Foam Tape

Jodi

October 25, 2010

Merry {Cuppie} Christmas!

Hi everyone! Happy Monday!!

Here is a card I made using Mercy's Tuesday Sketch Challenge from last Tuesday, MTSC96! What a fun sketch!!

I just got some DELISH new Echo Park Everybody Loves Christmas patterned paper and thought it would look sweet with one of my favorite Cuppies, this little cutie from Season's Sweetings from Taylored Expressions.

I just ADORE all of the Cuppies from Taylored Expressions. They are SO fun to color and they always make me smile! This little one was stamped in Memento Tuxedo Black onto Choice Buttercream Cardstock and colored with Copic Markers. I paper pieced her "cuppie liner" with one of the same patterns that I used on my card. I also stamped the holly/berry twice, colored it with Copics and popped it up on Foam Tape for some dimension.

I cut out and embossed this panel with Square Nestabilities which I then layered onto Scalloped Square Nestabilities cut from Intense Kiwi. The Intense Kiwi panel on the bottom, along with the Intense Pink panel, were embossed using the Snowflakes Impressabilities by Spellbinders. I also sponged the edges of all the panels (except for the Choice Buttercream mats) with Memento Rose Bud (on the pink panel), Memento Bamboo Leaves (on the kiwi panels) and Colorbox Aquamarine (on the patterned paper, focal point and card base).

I rounded the top corners of the card as well as one of the patterned paper panels using the Corner Chomper (this tool is addicting) and added some crazy sewing to each panel. I stamped the sentiment, "Merry Christmas", also from Season's Sweetings, onto the patterned paper, and I also added some White Brads to the top corner. A pink bow, created with the Bow Easy, finishes things off!

Thanks SO much for stopping by!! This cutie will be added to my Etsy Store if anyone is interested :)

Recipe:
Stamps: Season's Sweetings from Taylored Expressions
Paper: Intense Kiwi, Intense Pink, Island Mist Medium, Choice Buttercream & Everybody Loves Christmas by Echo Park Papers
Ink: Memento Tuxedo Black, Memento Bamboo Leaves, Memento Rose Bud & Colorbox Aquamarine
Accessories: Copic Markers, Square Nestabilities, Scalloped Square Nestabilities, Corner Chomper, Snowflake Impressabilities, White Brads, Sewing Machine, Pink Ribbon, Bow Easy, Sponges and Foam Tape

Jodi

October 24, 2010

POW!!

Hi everyone!! Happy Sunday!!

Here is a frame that I altered for my daughter, Meredith. As you can see in the picture of her (and seriously, how CUTE is she??? LOL), she takes Tae Kwon Do and is REALLY REALLY good at it (which is a bit shocking since I, her mother, am TOTALLY uncoordinated and un-athletic).

I have had this digi Karate Anya from The Greeting Farm for ages and knew she would be PERFECT to adorn the frame. I LOVE the stamps from The Greeting Farm...it's been ages since I've used one!

I printed her out onto Choice Snow White Cardstock and colored her with Copic Markers. I then cut her out and popped her up on layered Oval and Scalloped Oval Nestabilities.

The polka dot paper, to go with the black/white theme of my frame, is from Bo Bunny, and I painted the frame with black acrylic paint so that the parts that you can see are nice and finished.

In Tae Kwon Do, they say "Pow" each time they kick or punch, so I thought it would be fun to make a "Pow" banner for the frame. It was SUPER easy to make using the Die-Namics Banner Day Die and Banner Day Alphabet, both from My Favorite Things. A bow, which I created with the Bow Easy, finishes this off.

Thanks SO much for stopping by!!

Recipe:
Stamps: Karate Anya Digi from The Greeting Farm and Banner Day Alphabet from My Favorite Things
Paper: Choice Snow White, Black and Bo Bunny Polka Dot Paper
Ink: Memento Tuxedo Black
Accessories: Copic Markers, Oval and Scalloped Oval Nestabilities, Black Stitched Grosgrain Ribbon, Die-Namics Banner Day Die and Foam Tape

Jodi

October 23, 2010

Happy Birthday SFYTT!

Hi everyone! Happy Saturday!!

Here is my card for today's SFYTT (Sketch For You To Try). I have to admit, I {heart} today's sketch!

Today's SFYTT is being sponsored by an AMAZING company and product! You MUST check out Laura Pryor and her Lil' Inker Store for her Sentiment Flag Die and Stamp Bundle! It's AWESOME and a total must have! I ADORE this die and can see myself using it ALL of the time!!

For my card, I knew I wanted to use the "Happy Birthday" sentiment from Laura's set, so I chose an image to go along with it, the A la Modes in Time to Celebrate from My Favorite Things! I stamped her in Memento Tuxedo Black onto Choice Buttercream Cardstock and colored her with Copic Markers. I cut out and embossed the panel with Circle Nestabilities and sponged the edges with Memento Desert Sand and Memento Potter's Clay. I layered the focal panel onto cardstock cut with Lacey Circles Nestabilities (LOVE these!!).

The patterned paper is Pyrus from Basic Grey (yummy!) and I sponged the edges of the papers as well for a bit of depth. I stamped the frame and Happy Birthday sentiment from Lil' Inker Designs in Memento Tuxedo Black onto Choice Buttercream and cut it out using the matching die (which is SO fun!). I sponged the edges of this panel as well.

I cut out cardstock using the Die-Namics Jumbo Ric Rac Die and added some lace trim on top. The flower was cut from My Favorite Felt - Beautiful Garden (the chocolate brown) using the Die-Namics Perfect Petal Trio and the button was cut from cardstock using the Die-Namics Button Quartet. I added some embroidery thread in a bow to the cardstock button. To finish off my card, I rounded the bottom corners using the Corner Chomper (which I HAD to get due to Jackie Pedro's {one of the newest SCS Dirty Dozen...WOOT} enabling).

Make sure you head on over and visit my SFYTT sisters for today's SFYTT!

Amber Hight
Amy Rohl
Amy Sheffer
Carole Burrage
Jen del Muro
Jenn Diercks
Kelly Lunceford
Megan Lock
Sony Christoph
Susan Liles
Lesa Smaligo - Our AWESOME October Designer of the Month!

Thanks SO much for stopping by! I will be adding this card to my Etsy Store if anyone is interested!

Recipe:
Stamps: Sentiment Flags by Lil' Inker and A la Modes Time To Celebrate from My Favorite Things
Paper: Choice Buttercream, Bazzill Cardstock & Pyrus from Basic Grey
Ink: Memento Tuxedo Black, Memento Desert Sand, Memento Potters Clay
Accessories: Copic Markers, Circle Nestabilities, Lacey Circles Nestabilities, Die-Namics Jumbo Ric Rac Die, Die-Namics Perfect Petal Trio, Die-Namics Button Quartet, Embroidery Thread, My Favorite Felt in Beautiful Garden, Lace Trim by Kaisercraft, Corner Chomper and Foam Tape

Jodi

October 22, 2010

October Blast From The Past Blog Hop!

Hi everyone! Happy Friday!!

Welcome to the October Taylored Expressions Blast From The Past Blog Hop!! This month's focus is all about the holidays! I used the sketch designed by my fellow Baker's Dozen member, Sankari! LOVE this sketch...so many possibilities

For my card, I used one of my ALL time favorite sets from Taylored Expressions, Wings Of Joy! I stamped "Joy" in Memento Tuxedo Black onto Choice Buttercream Cardstock and colored it with Copic Markers. I cut out and embossed the panel with Rectangle Nestabilities, and leaving the cardstock in the die, I sponged the edges with Memento Desert Sand and Memento Potters Clay.

The sentiment, Merry Christmas, is also from Wings of Joy, and I stamped it again in Memento Tuxedo Black onto a piece of cardstock cut with the Take Note Frame 3 Die. I sponged the edges of this panel as well, as I did for all the panels, and added three little pearls. I LOVE how this die makes such an elegant sentiment panel when you just use a portion of it!

All of the cardstock, patterned paper (Tinsel and Twig from The Girls Paperie) and pearls are from the Tinsel & Twig Project Pantry Kit from Taylored Expressions and the ribbon is from my stash. It's a bit hard to see in the photograph, but I've used the red pearls from this Project Pantry Kit as the berries on the holly in the focal image. My favorite Scalloped Eyelet Border Die separates the panels and I machine stitched each panel. A quartet of pearls on the bottom left corner finishes this one off.


Make sure to check out the creations from the rest of these hoppers today!


Thanks SO much for stopping by! I will be adding this card to my Etsy Store today if you are interested!

Recipe:
Stamps: Wings of Joy from Taylored Expressions
Paper: Choice Buttercream, Cardstock, and Tinsel & Twig from The Girls Paperie, all from the Tinsel & Twig Project Pantry Kit from Taylored Expressions
Ink: Memento Tuxedo Black, Memento Desert Sand and Memento Potters Clay
Accessories: Copic Markers, Rectangle Nestabilities, Pearls from The Tinsel & Twig Project Pantry Kit from Taylored Expressions, Scalloped Eyelet Border Die, Take Note Frame 3 Die, Sponges, Sewing Machine and Foam Tape

Jodi

October 20, 2010

Sending Candy Cane Kisses!

Hi everyone! Happy Wednesday!

Here is a card I made using one of the recently released A la Modes stamps from My Favorite Things, Candy Cane Kisses. I hadn't inked her up yet and couldn't wait any longer!!

I stamped her in Memento Tuxedo Black onto X Press It Blending paper and colored her with Copic Markers. I cut her out and embossed her with Rectangle Nestabilities and then sewed around the edges.

I added a silver brad to each corner, and the top left hand corner also received a layered snowflake that I cut out using the new Die-Namics Let It Snowflake dies...LOVE these!!!

The patterned paper is from Cottage Christmas by Imaginesce and I separated the two patterns with the Die-Namics Oval Chain Border.

The sentiment, "Sending Candy Cane Kisses" was cut out, embossed and layered using Oval and Scalloped Oval Nestabilties, and all of the layers were sewn on my sewing machine!

I will be adding this card, along with TONS of others, to my Etsy store if you are interested!!

Thanks SO much for stopping by!!

Recipe:
Stamps: A la Modes - Candy Cane Kisses from My Favorite Things
Paper: Red, White, X Press It Blending Pad and Cottage Christmas by Imaginesce
Ink: Memento Tuxedo Black
Accessories: Copic Markers, Rectangle Nestabilities, Silver Brads, Die-Namics Let It Snowflake Die, Die-Namics Oval Chain Border Die, Oval and Scalloped Oval Nestabilities, Rectangle Nestabilities, Sewing Machine and Foam Tape

Jodi

October 19, 2010

Sweet Treats for Avery!

Hi everyone! Happy Tuesday!!

Here is a card I created for my sweet Avery! She is going to be a ladybug for Halloween (I will be sure to post pics...she is going to look SO cute!), and I wanted her first Halloween card to be personalized!

Now...PLEASE don't go looking for a ladybug stamp over @ MFT!! I used the Pure Innocence Honey Bee set for my card, but did a bit of altering!! I have seen this done with images from The Greeting Farm, so I thought I would see if I could take this cutie and give her a ladybug costume instead of a bumble bee costume!!

I started by inking her up in Memento Tuxedo Black and before stamping her onto X Press It Blending Card, I, VERY carefully wiped the ink off from the stripes on her costume. I then stamped her and used a Copic Multiliner to draw in the circles for the ladybug dots and to also fix the lines of the image that I screwed up when removing ink (the Copic Multiliner is a MUST have in my opinion!).

Once I had her the way I wanted her, I colored her with Copic Markers. I added some shimmer to her wings with a Clear Spica Glitter Pen, and added an "A" to her Halloween basket using the Banner Day Alphabet, also from MFT!

I kept the layout SUPER simple, as I really wanted the focus to be on my image. I cut out and embossed the focal panel with Oval Nestabilities which I layered onto Scallop Oval Nestabilities. I then layered the entire focal panel over three layers of cardstock cut with Rectangle Nestabilities. I attached four of Taylor's Tiny Twinkles in red for a bit of pop.

The patterned paper is from Happy Halloween by Echo Park Papers, and I used the sentiment,
"Sweet Treats" from Pure Innocence Honey Bee, which I punched out using my Word Window Punch. I also added some red embroidery thread for a bit of embellishment.

Thanks SO much for stopping by!!

Recipe:
Stamps: Pure Innocence Honey Bee and Banner Day Alphabet from My Favorite Things
Paper: Basic Black, Whisper White, Classic Red, X Press It Blending Card & Happy Halloween by Echo Park Papers
Ink: Memento Tuxedo Black
Accessories: Copic Markers, Copic Multiliner, Clear Spica Glitter Pen, Taylor's Tiny Twinkles, Oval and Scalloped Oval Nestabilities, Rectangle Nestabilities, Word Window Punch, Red Embroidery Thread and Foam Tape

Jodi

October 18, 2010

Best Witches For A Spooktacular Halloween!

Hi everyone! Happy Monday!!

Here is a card I created for today's challenge on the There She Goes Blog, TSG77, which is a color challenge of orange, black & green brought to us by Sandra, the Trendsetter of the Week!

I started with Karen's Sweet Sunday Sketch from yesterday, SSSC89, but made my focal panel a circle instead of a rectangle.

For my card, I used the DARLING new Hauntingly Delightful set from There She Goes and I stamped the witch in Memento Tuxedo Black onto X Press It Blending paper and colored her with Copic Markers. I cut out and embossed the panel with Circle Nestabilities. The star on her hat got a bit of shine with a Clear Spica Glitter Pen.

The patterned paper is all from Happy Halloween from Echo Park Papers...LOVE this collection! The border was created with the Die-Namics Open Scallop Border and I sewed all the layers on my sewing machine. I added some green gems to the border die and a fun plaid bow created with my Bow Easy.

The sentiment, "Best Witches for a spooktacular Halloween", also from Hauntingly Delightful, was stamped directly onto the patterned paper. I finished this one off with two Black Brads from American Crafts.

We would LOVE you to play along! Simply create a card using the above recipe and link your creation to today's TSG77 post on the There She Goes Blog! The challenge is open until the winner is announced on the following Monday. The winner will receive a $5.00 Gift Certificate to the There She Goes Store!

By participating in this challenge you may also find yourself in the Trendsetting Spotlight that shines on the TSG Blog every Thursday! We will be on the lookout to find challenge cards that stand out and show Trendsetting qualities. TSG stamps are not required to participate in the challenges but they are appreciated!Thanks SO much for stopping by!!

Thanks SO much for stopping by!!

Recipe:
Stamps: Hauntingly Delightful by There She Goes
Paper: Intense Kiwi, White, X Press It Blending Pad & Happy Halloween by Echo Park Papers
Ink: Memento Tuxedo Black
Accessories: Copic Markers, Circle Nestabilities, Die-Namics Open Scallop Border, Sewing Machine, Black Brads by American Crafts, Green Gems, Orange Plaid Ribbon, Bow Easy and Foam Tape

Jodi

October 17, 2010

Sending You A Little Christmas!

Hi everyone! Happy Sunday!!

Here is a card I created with some delish new goodies from my last MFT order (it's a sickness!).

I LOVE this new Pure Innocence Sending You A Little Christmas and I could not even wait to ink her up!! I stamped her in Memento Tuxedo Black onto the new X Press It Blending Paper (also from MFT but it must be out of stock) and colored her with Copic Markers. This paper is RIDICULOUSLY fabulous...if you color with Copics than you must try this paper!

I cut out and embossed the panel with Square Nestabilities and sponged the edges a bit so that it matched the patterned paper I used, Tinsel & Twig from The Girls Paperie. All of the papers from The Girls Paperie make me happy...I have to get some more asap! All of the cardstock, patterned paper, ribbon and pearls on my card today are from the Tinsel & Twig Project Pantry Kit, available from Taylored Expressions. Everything you need to create a perfectly coordinated card...love that!

I created the scallop border using the Die-Namics Jumbo Scallop Die and some My Favorite Felt Necessary Neutral felt. I love the warmth that felt lends to a card...it just makes me happy! Want to know what else makes me happy? The super sparkly snowflake/button combo! I {heart} the new Die-Namics Let It Snowflake Die and used it here to create my snowflakes. I die cut two of them, glittered them up and then attached them to my card with a die cut of the new Die-Namics Button Quartet (LOVE these too!). Some simple embroidery thread ties it all together (grin!) and I popped it up on foam tape. I LOVE how I can create a button to match any card...how FUN is that?

I now have a store on Etsy and this card will be listed for sale as well! Here is my new store:
(very original name huh?...LOL!)

Thanks SO much for stopping by!!

Recipe:
Stamps: Pure Innocence Sending You A Little Christmas from My Favorite Things
Paper: Choice Buttercream, Cardstock & Tinsel and Twig from The Girls Paperie, all from the Tinsel & Twig Project Pantry Kit from Taylored Expressions and X Press It Blending Card from MFT
Ink: Memento Tuxedo Black, Memento Cantaloupe & Memento Tangelo
Accessories: Square Nestabilities, Die-Namics Jumbo Scallop Die, Die-namics Let It Snowflake Die, Die-Namics Button Quartet, Glitter, My Favorite Felt Necessary Neutrals, Embroidery Thread, Ribbon and Pearls from the Tinsel & Twig Project Pantry Kit from Taylored Expressions, Copic Markers and Foam Tape

Jodi

October 16, 2010

Trick Or Treat!!

Hi everyone! Happy Saturday!!

Here is my card for today's Sketch For You To Try (SFYTT)!!

I had SO much fun making this card! My oldest daughter (it seems so strange to say that, now that I have two daughters!), Meredith, is going to be Dorothy for Halloween this year, so I thought I would make her card using today's sketch!

I started with this DARLING Dorothy Anya which (I think!) is from the retired Signature set from The Greeting Farm and stamped her in Memento Tuxedo Black onto X Press It Blending paper (LOVE!) and colored her with Copic Markers.
I cut her out and embossed the panel with Oval Nestabilities which I layered over Scalloped Oval Nestabilities. I sponged the edges of the focal panel before removing it from the die.

The patterned paper is all from Matilda by Cosmo Cricket, and I used some Die-Namics for extra pop. The cream and black border were cut with the Die-Namics Scalloped Scallop Die (the cream) and the Die-namics Jumbo Scalloped Die (the black). I added orange gems to the black panel to make it pop a bit.

The paper buttons were cut with the new (and AWESOME) Die-namics Button Quartet (LOVE) and I added a bow of black gingham ribbon to make them pop. I also attached another bow of Black Gingham Ribbon that I created with the Bow Easy to the border panel. A few more gems, this time in black, on the bottom of the card added a bit of sparkle.

The sentiment, "Trick or Treat" is from the delightful new Hauntingly Delightful set from There She Goes, and I stamped it directly onto the cardstock panel.

Make sure you head on over and visit my SFYTT sisters for today's SFYTT!

Amber Hight
Amy Rohl
Amy Sheffer
Carole Burrage
Jen del Muro
Jenn Diercks
Kelly Lunceford
Megan Lock
Sony Christoph
Susan Liles
Lesa Smaligo - Our AWESOME October Designer of the Month!

Thanks SO much for stopping by!

Recipe:
Stamps: Signature Anya set from The Greeting Farm
Paper: Papaya Puree Dark, Choice Buttercream, Basic Black, X Press It Blending Paper & Matilda by Cosmo Cricket
Ink: Memento Tuxedo Black, Memento Cantaloupe & Memento Tangelo
Accessories: Copic Markers, Oval and Scalloped Oval Nestabilities, Orange and Black Gems, Die-Namics Button Quartet, Die-Namics Jumbo Scalloped Die, Die-Namics Scalloped Scallop Die, Black Gingham Ribbon, Sponges and Foam Tape

Jodi

October 15, 2010

Dear Santa...I Can Explain!

Hi everyone! Happy Friday!

Here is a card I created using my new Lacey Circle Nestabilities...they make me happy!!

To start, I pulled out the brand new (and super darling) Hangin' Out At The North Pole from Taylored Expressions and stamped Santa's jacket in Memento Tuxedo Black onto Choice Buttercream Cardstock.

I colored the coat with Copic Markers and then cut out and embossed the panel with Circle Nestabilities. I sponged the edges with Memento Cantaloupe and Memento Tangelo. I then added Liquid Applique, along with a sprinkle of Starfire Glitter, to all of the trim on the coat. Once it was dry, I heat embossed it to puff it up. SO fun and sparkly!! I layered my focal panel on top of cardstock cut with the new Lacey Circle Nestabilities...I am in L-O-V-E!

All the cardstock, patterned paper, ribbon, pearls and stick pin are from the brand new (and totally luscious) Tinsel & Twig Project Pantry Kit from Taylored Expressions. Using this kit really made my card come together super fast...gotta love that! I did separate the panels of the sketch using the awesome Scalloped Eyelet Border Die...I swear, I find it hard to make a card without it!!

The sentiment, "Dear Santa, I can explain", is also from Hangin' Out At The North Pole, and I stamped it again with Memento Tuxedo Black and cut it out and embossed it using one of the ribbon slider Nestabilities (I wish I could remember the name of these...anyone know?), and once again, sponged it with the same inks as I used above on the focal panel. A simple bow, a Christmas Tree stick pin (LOVE!) and some red pearls finish this one off! All of the layers are popped up on Foam Tape for dimension.

Thanks SO much for stopping by!!

Recipe:
Stamps: Hangin' Out At The North Pole from Taylored Expressions
Paper: Choice Buttercream, Cardstock and Tinsel & Twig by The Girls Paperie, all from the Tinsel & Twig Project Pantry Kit from Taylored Expressions
Ink: Memento Tuxedo Black, Memento Cantaloupe & Memento Tangelo
Accessories: Copic Markers, Circle Nestabilities, Lacey Circle Nestabilities, Liquid Applique, Starfire Glitter, Ribbon, Christmas Tree Stick Pin & Red Pearls, all from the Tinsel & Twig Project Pantry Kit from Taylored Expressions, Ribbon Slider Nestabilities, Scalloped Eyelet Border Die and Foam Tape


Jodi

October 14, 2010

My Favorite Die-Namics Storage!

Hi everyone! Happy Wednesday!

Here is a little project I created to house my ever growing collection of Die-Namics! I thought it would be handy to have them all in one place and one of the Perfect Package Card Boxes from Taylored Expressions was the perfect storage solution.

For my Die-Namics storage box, I started by collecting some of my favorite things to incorporate:

1. A la Modes in Miss You A Latte
2. Togetherness papers by Cosmo Cricket
3. Polka Dots Embossing Folder
4. Felt
5. Wood buttons
6. Die-Namics Perfect Petal Trio
7. Die-Namics Framed Greeting Die and Stamp Set
8. Banner Day Alphabet
9. Lacey Circles Nestabilities
10. Copic Markers

I started by stamping the A la Modes Miss You A Latte in Memento Tuxedo Black onto Choice Buttercream Cardstock and colored her with Copic Markers. I cut out and embossed the image with Circle Nestabilities which I layered over Soft Suede cut from Lacey Circle Nestabilities.

I created a layered flower with the Die-Namics Perfect Petal Trio and sewed a wood button to attach them together. I also used the Die-Namics Flower Trio and Leaf Trio to create the leaves. The flower was cut from My Favorite Felt - Banana Split (the pink) and the leaves were cut from My Favorite Felt - Beautiful Garden (the green).


For the front panel of my box, I used the Die-Namics Framed Greeting Die and Stamp Set, and when inking up the sentiment, "You are one of my favorite things", I only inked up the "favorite things" portion and using the Banner Day Alphabet, stamped "my" above the sentiment. The entire panel was cut with the die and I added another felt flower to make it pop.

All of the patterned paper was embossed with the Polka Dots Embossing Folder and I sewed each panel with my sewing machine.

You can see how nicely all of the Die-Namics fit in the box, even the border dies! This box just makes me happy!!

Thanks SO much for stopping by!!

Recipe:
Stamps: A La Modes in Miss You A Latte, Banner Day Alphabet & Framed Greetings by My Favorite Things
Paper: Soft Suede, Choice Buttercream & Togetherness by Cosmo Cricket
Ink: Memento Tuxedo Black, Memento Cantaloupe & Memento Tangelo
Accessories: Circle Nestabilities, Lacey Circles Nestabilities, Sewing Machine, Polka Dots Embossing Folder, Die-Namics Perfect Petal Trio, Die-Namics Flower Trio and Leaf Trio, Die-namics Framed Greeting Die, Wood Buttons, Copic Markers and Foam Tape

Jodi

October 13, 2010

Warm Winter Wishes!

Hi everyone! Happy Wednesday!!

Here is a card I created using the Taylored Expressions Sketch Challenge from this past Friday, TESC131!

As soon as I saw the sketch, I knew just what I wanted to do! I pulled out the brand new Hangin' Out At The North Pole from Taylored Expressions and stamped the two different stockings in Memento Tuxedo Black onto Choice Buttercream Cardstock and colored them with Copic Markers.

I cut out and embossed the panel with Square Nestabilities (I think that both the Large and Small Rectangle Nestabilities are a must have!). I have seen so many cards using frames these days, and it was VERY easy to re-create that look using Nestabilities.

I stamped the sentiment, "Warm Winter Wishes", from the new Winter Wonderland set from Taylored Expressions in Memento Tuxedo Black on the bottom right corner of my panel. I then put the Nestie back onto my panel and, using a Copic Multi-Liner, simply traced around the inside of the nestie, leaving a space around the sentiment. Easy peasy and I LOVE the look of this! While I was at it, I sponged the edges with Memento Cantaloupe and Memento Tangelo. I can't wait to try this with other Nesties...love some of the Labels...wouldn't that look gorgeous?

The patterned paper is from Mitten Weather by Cosmo Cricket, and as you can see, I used my beloved Scalloped Eyelet Border Die to create the border on the bottom. My main panel of Island Mist Light was embossed with the Polka Dots Embossing Folder and I used my Bow Easy to create the Baja Breeze Striped Grosgrain Bow. Three Taylor's Tiny Twinkles under the focal panel finish this one off (I did use the Embellie Gellie to put them on)!! All of the panels are popped up on Foam Tape for dimension.


Thanks SO much for stopping by!!

Recipe:
Stamps: Hangin' Out At The North Pole & Winter Wonderland from Taylored Expressions
Paper: Choice Buttercream, Island Mist Light, Blush Red Dark and Mitten Weather by Cosmo Cricket
Ink: Memento Tuxedo Black, Memento Cantaloupe & Memento Tangelo
Accessories: Copic Markers, Copic Multi-Liner, Square Nestabilities, Taylor's Tiny Twinkles, Scalloped Eyelet Border Die, Bow Easy, Baja Breeze Striped Grosgrain Ribbon, Polka Dots Embossing Folder and Foam Tape

Jodi

October 12, 2010

For A Sweet Little Girl!

Hi everyone! Happy Tuesday!!

Here is a card I created for last week's Wednesday Stamp Club Challenge, Sketch Time! SUCH a fun sketch...I am so glad I was able to get this one in before there is another challenge tomorrow!

I wanted to make a card for my sweet Meredith! She LOVES when I give her cards (actually, she thinks each card that I make is for her), and I thought it was high time I inked up this sweet Emma Playing Mommy from MFT!

I stamped her in Memento Tuxedo Black onto Choice Buttercream Cardstock and colored her with Copic Markers. Her dress was paper pieced with some Mitten Weather paper from Cosmo Cricket and I added Taylor's Tiny Twinkles on her necklace...SO super cute in real life!

The patterned paper on the card is also from Mitten Weather, and the sentiment, "For A Sweet Little Girl" was stamped on Kraft portion of the Die-Namics Banner Die Trio that I used for the three panels on the sketch. SO fun! I finished this one off with a ribbon/bow combo of Baja Breeze Striped Ribbon and I used the Bow Easy to create the bow!

Thanks SO much for stopping by!!

Recipe:
Stamps: Emma Playing Mommy from My Favorite Things
Paper: Island Mist Light, Kraft, Choice Buttercream & Mitten Weather by Cosmo Cricket
Ink: Memento Tuxedo Black
Accessories: Die-Namics Banner Die Trio, Copic Markers, Baja Breeze Striped Ribbon, Bow Easy, Taylor's Tiny Twinkles and Foam Tape

Jodi

October 11, 2010

Boo!

Hi everyone! Happy Monday!!

Here is a card I created for today's challenge on the There She Goes Blog, TSG76, which is brought to us by the Trendsetter of the Week, Piali!

Piali has challenged one and all to create a card using the following recipe:

- Kraft Card Base (check)
- Black, White and a splash of color (I went with orange - check
- Dry Embossing (I used the Spiderwebs EF and the Polka Dots EF - check)

This was SO much fun to make!! I started with Saturday's sketch from The Sweet Stop, SSS77! I stamped this ADORABLE ghost from the newly released Hauntingly Delightful set from There She Goes in Memento Tuxedo Black onto Choice Snow White Cardstock and colored him with Copic Markers. I cut out and embossed the panel with Circle Nestabilities and layered it over orange cardstock cut from Circle Nestabilities and black cardstock cut from the new Lacey Circles Nestabilities. I used the same layers and Nestabilities for the sentiment, "Boo", also from Hauntingly Delightful. I added a bit of paper piercing around the orange layers on both.

I embossed the white panel with Spiderwebs Embossing Folder, and the orange and kraft panels with the Polka Dots Embossing Folder. All of the layers were sewn on my sewing machine and I added some baby braddies to the top left and bottom right corners.

The polka dot patterned paper is from Happy Halloween by Echo Park Papers and I created the double bows of orange grosgrain and black gingham with the Bow Easy. I attached a fun Happy Halloween button to the center of my bows (which I sewed upside down - baby brain!) from my stash.

We would LOVE you to play along! Simply create a card using the above recipe and link your creation to today's TSG76 post on the There She Goes Blog! The challenge is open until the winner is announced on the following Monday (10-18-10). The winner will receive a $5.00 Gift Certificate to the There She Goes Store!

By participating in this challenge you may also find yourself in the Trendsetting Spotlight that shines on the TSG Blog every Thursday! We will be on the lookout to find challenge cards that stand out and show Trendsetting qualities. TSG stamps are not required to participate in the challenges but they are appreciated!

Thanks SO much for stopping by!!

Recipe:
Stamps: Hauntingly Delightful from There She Goes
Paper: Papaya Puree Dark, Choice Snow White, Basic Black, Kraft & Happy Halloween by Echo Park Papers
Ink: Memento Tuxedo Black
Accessories: Circle Nestabilities, Lacey Circle Nestabilities, Copic Markers, Spiderwebs Embossing Folder, Polka Dot Embossing Folder, Sewing Machine, Orange Grosgrain Ribbon, Black Gingham Ribbon, Black Baby Braddies, Happy Halloween Button and Foam Tape

Jodi

October 10, 2010

Miss You A Latte!

Hi everyone!! Happy Sunday!

I was SO excited that I was able to get in a little stampy time...this SUPER darling new A La Modes Miss You A Latte from My Favorite Things arrived while I was in the hospital (along with her friend A La Modes Candy Cane Kisses) and I couldn't wait to ink her up!!

I started with last week's Sketch Challenge on SCS, SC301 for the layout. I stamped this sweetie in Memento Tuxedo Black onto Choice Buttercream Cardstock and colored her with Copic Markers.

I cut out and embossed the focal panel with Rectangle Nestabilities and while the cardstock was in the nestie, I sponged the edges with Memento Desert Sand and Memento Potters Clay.

All the patterned paper is from Tinsel & Twig by The Girls Paperie...YUM! I love the patterns in this collection and I LOVE how they lend themselves to everyday cards, not just for Christmas! I sponged the edges of each pattern with Memento Potters Clay to age them a bit, and each layer, including the focal panel, was sewn on my sewing machine.

The cardstock (except for the Suede Brown Dark), patterned paper (Tinsel & Twig), ribbon and pearls are all from the brand new Tinsel & Twig Project Pantry Kit from Taylored Expressions. I created the bow with the Bow Easy!

I decided to leave off a sentiment for now, as I am not sure yet who will receive this card!

Thanks SO much for stopping by!!

Recipe:
Stamps: The A la Modes in Miss You A Latte by My Favorite Things
Paper: Suede Brown Dark, Choice Buttercream, Cardstock & Tinsel and Twig by The Girls Paperie, all from The Tinsel & Twig Project Pantry Kit from Taylored Expressions
Ink: Memento Tuxedo Black, Memento Desert Sand & Memento Potters Clay
Accessories: Copic Markers, Rectangle Nestabilities, Ribbon & Pearls from the Tinsel & Twig Project Pantry Kit from Taylored Expressions, Sewing Machine, Bow Easy, Sponges & Foam Tape

Jodi

October 9, 2010

OMGolly!

Hi everyone! Happy Saturday!!

Here is my card for today's Sketch For You To Try, SFYTT!! I was SO excited to get a bit of stampy time to create! I was afraid my mojo was gone for good!!

For my card today, I used the ADORABLE new Hangin' Out At The North Pole, released on Thursday from Taylored Expressions!! Isn't this snowman so super cute?

I started by stamping him in Memento Tuxedo Black onto Choice Snow White Cardstock and colored him with Copic Markers. I gave him a coat of Smooch Illuminate and he is quite shimmery in real life. I cut him out and embossed the panel with Rectangle Nestabilities, first cutting around his mittens so they are "out of the box".

All the cardstock, patterned paper, ribbon and bling are from the AMAZING new Snow Day Project Pantry Kit, also from Taylored Expressions. The patterned paper is Snow Day by Crate Paper and it totally makes me happy! After putting together the background of my card, I ran it through the Cuttlebug with the Snowflakes Embossing Folder.

The layered snowflake was created with the FANTABULOUS new Winter Wonderland Snowflake Dies and I first stamped one of the snowflakes from Winter Wonderland in Memento Grape Jelly. LOVE these snowflakes! I added some of the bling from the Snow Day Project Pantry Kit all around the snowflake for even more fun and both snowflakes got a coat of Smooch Illuminate too! The two background panels were defined with the Scalloped Eyelet Border Die, the bow was created with my beloved Bow Easy and I sewed all the layers with my sewing machine.


Make sure you head on over and visit my SFYTT sisters for today's SFYTT!

Amber Hight
Amy Rohl
Amy Sheffer
Carole Burrage
Jen del Muro
Jenn Diercks
Kelly Lunceford
Megan Lock
Sony Christoph
Susan Liles
Lesa Smaligo - Our AWESOME October Designer of the Month!

Thanks SO much for stopping by!

Recipe:
Stamps: Hangin' Out At The North Pole and Winter Wonderland from Taylored Expressions
Paper: Choice Snow White, Cardstock & Crate Paper Snow Day, all from the Snow Day Project Pantry Kit from Taylored Expressions
Paper: Memento Tuxedo Black and Memento Grape Jelly
Accessories: Ribbon & Bling from the Snow Day Project Pantry Kit, Rectangle Nestabilities, Scalloped Eyelet Border Die, Winter Wonderland Snowflake Dies, Smooch Illuminate, Copic Markers, Sewing Machine, Bow Easy and Foam Tape

Jodi

October 7, 2010

Release Day @ Taylored Expressions!

Hi everyone!! Happy Thursday!!

Today is Release Day @ Taylored Expressions and all of the AMAZING new stamp sets, Project Pantry Kits and new Taylored Dies are now available!!!

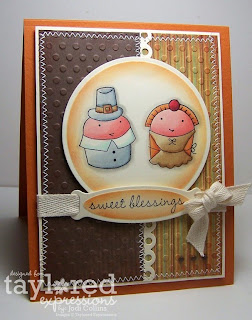
I have another card to share with you using the ADORABLE new Cuppie set, Gobble Gobble!!!

For my card, I used a recent Taylored Expressions Sketch Challenge, TESC129. I started by stamping the pilgrim Cuppie and Mrs. Cuppie (grin!) in Memento Tuxedo Black onto Choice Buttercream Cardstock and colored them with Copic Markers.

I cut them out and embossed the panel with Circle Nestabilities and sponged the edges with Memento Cantaloupe and Memento Tangelo to make it pop a bit.

The sentiment, "sweet blessings" is also from Gobble Gobble and I cut it out, embossed it and sponged it the same as above, using a ribbon Spellbinders die. Once again, I used my beloved Scalloped Eyelet Border Die to separate the two different patterns of paper, which are all from Wanted by Cosmo Cricket.

I sponged the edges of the Wanted paper as well and embossed them with the Polka Dots Embossing Folder for more texture. I sewed each layer with my sewing machine and added some brads to the bottom corner. A simple twill bow, created with the Bow Easy, finishes this one off!!


Make sure to check out what the rest of the Baker's Dozen have cooked up for Release Day!!

Barbara Anders - September & October Guest Designer!
Charmaine Ikach
Danielle Lounds
Donna Baker
Jackie Pedro
Karen Giron
Karen Motz
Melissa Sauls
Regina Mangum
Sankari Wegman
Tori Wild
and, of course, Taylor Van Bruggen!

Also peeking along with us today are the fabulous:

Jami Sibley

Nancy McKinney

Thanks SO much for stopping by! Head on over to Taylored Expressions for all the new goodies available NOW!!

Recipe:
Stamps: Gobble Gobble from Taylored Expressions
Paper: Papaya Puree Dark, Choice Buttercream & Wanted by Cosmo Cricket
Ink: Memento Tuxedo Black, Memento Cantaloupe & Memento Tangelo
Accessories: Copic Markers, Polka Dots Embossing Folder, Circle Nestabilities, Ribbon Die by Spellbinders, Twill Ribbon, Bow Easy, Brads, Sewing Machine, Scalloped Eyelet Border Die and Foam Tape

Jodi